
Much apologies for the lack of posts. It has been one hectic week for myself (and might get even more busy soon). Nonetheless, I’ll try my best to keep up with the updates.
Anyway, I was pondering over the trap room posts categories and I realised that having a middle section wouldn’t make much sense. Hence, I’ve decided to do away with it and jump straight to elaborating upon the specific trap rooms.
Part 1: General Overview
Part 2.1-2.10: Specific Trap Rooms (<- you’re reading this now)
Actually, I was wondering to myself whether I should even continue with these posts for trap rooms since word has it that stronghold mechanics is going to be revised, with trap rooms taking center stage to how one builds his/her stronghold (source: Syrann).
“You won’t have to worry about changes to the variants since there will not be any variants anymore, there will simply be your trap room and how you choose to build the bonuses yourself.” – Gameloft_Syrann
But since there hasn’t been information on whether the trap room mechanic will be changed (eg. the way it damages players, position of the trap ’emitters’, overall size), then I see no reason not to continue. 🙂
As with Avqi Teig’s request, I’ll start with the Valenthian Guardhouse, which I daresay is one of the most powerful trap rooms in terms of offensive and defensive capabilities at the moment.
Valenthian Guardhouse
*Edit: I realised that the first version had incorrect minion positions, updated all the maps accordingly.

Room Type: ‘Status Inflictor’ (Invincibility aura)
Upkeep: 5 (T3); 10 (T4); 15 (T5)
Element: Light
Description
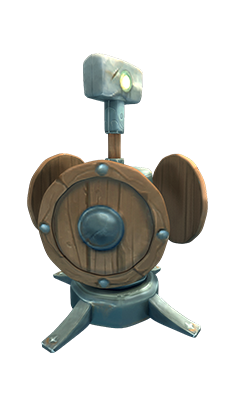
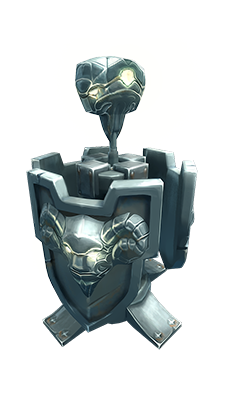
The Valenthian Guardhouse features 4 spinning ‘turrets’ (shown above), that emit a light-based aura every few seconds. Minions who come into contact of this light-based aura are literally immune as long as they stand within the post and if the turret doesn’t get destroyed. Raiders who come into contact with the aura get low amounts of damage, just enough to cause your character to ‘jerk back‘ and interrupt your attacking momentum at times.

These posts are situated in a 2 x 2 grid which cover pretty much a good ~30% of the map, leaving the sides and the center area free from the auras.
Evolving this trap room from T3 to 5 will effectively reduce the amount of walk-able area where raiders can travel around within the stronghold by putting up walls in between the turrets. Thus, this ultimately makes the trap room more dangerous as minions can swarm you easily with little room to escape or retaliate.
The evolution can also be recognised by the style of the turrets (picture above), where the shields get larger and their designs get more intricate. Proportionally, the HP of the turrets increases as the trap room tiers up, ranging from being destroyed by a single lightning bolt from a light shield in T3 to a couple of hits from a weapon with decent attack in T5.
Another thing to note would be that the turrets automatically turn back on exactly 10 seconds after they get destroyed, which I say is sufficient time to take down at least one champion if you focus your attacks on him/her.
If you are Raiding one…
Upon entering the stronghold, there will be an aerial pan-through of the entire stronghold, trap room and minions in all. Within these crucial 2 seconds, be sure to take a brief note of how many minions there are, the type of minions and how they are scattered. (Kinda think of it, I should make a blog post to explain how. :))

However, a (nasty) trick to this would be that in certain trap rooms, there happens to be a ‘blind zone’ where the aerial pan-through will miss out, unless your minion happens to be about 10 feet tall (eg. Colossus or Kenashi Warlord size).
Well, it turns out that the Valenthian Stronghold happens to be one of them, and this poses a great issue as 3+ minions can be easily hidden within this spot (see map below). Thus, be cautious if you decide to ‘tank’ all the incoming minions at the start as you might be swarmed faster than you know it.

(Also, if you want to get technical about it, you can do a quick calculation to how many minions you’ll expect to see on the map based on the opponent’s level and the auras underneath the normal and Xinkashi minions… …okay, I will seriously get down to writing that post once I’m done with this one.)
Hence, if you see swarms of black and purple (eg. Voror knights) at the front, do consider to run far far away should you possess anything less than 6k stats. But ultimately, player discretion is highly necessary!

(A) General Strategy
The trick to this map would be to take down one of the turrets as soon as possible and selectively remove major threats (eg. Champions, Voror Knight, Gelid Voror) within the stronghold confines.
Usually I pick the back row ones as players tend to crowd their minions at the front or mid-rows, leaving the back vacant.

What I don’t suggest would be to park yourself at the middle row as you might accidentally knockback minions to either the front or back row turrets. This unintentionally gives them the invincibility aura, which might be disastrous if you’re fighting high HP minions.

Should the turrent be surrounded, you can either knockback/ stun/ fear minions (though they take no damage), dish out an AOE skill to create the same effect, or opt for another less-crowded tower.
TL;DR: Run to a turret (except mid-row) and take it out first, then proceed to remove major threats and other monsters.
(B) For Melee Players
In my opinion, Melee players will have a stronger advantage (than ranged players) in this map, that is if you’ve geared your player well (ie. equipped with weapons/armor that handle swarms of minions converging upon you).
Weapon type I would recommend would be the Glaive as its sweep attack is able to dish out 180 degrees (aka all-around) of AOE damage. This will help you remove not only stronger minions, but also the turret and weaker prey lingering in the vicinity, making your job much easier in the long run.
If your main weapon types are greatsword or dual blades, it’ll be better to focus on taking down targets individually so they don’t run off and possibly get healed. Haste and Shield skills work well to aid you in your tanking process.
Use the staircase to your advantage to bottle-neck melee type minions. Standing at point 2, you can eliminate a good deal of minions on that side of the tower before the opposite side minions catch up to you.

More importantly, be wary of when the turret turns back on. Have a mental gauge of how long you take down minions and also the 10-seconds time frame. If you’re standing next to the staircase, your character should be able to take out the turret again easily in a few swipes.

However, if you’re running low on HP or if the minions are too much for you to handle, remember to retreat when necessary so you don’t cause the whole map to swarm upon you all at once.
(C) For Ranged Players
You’ll be doing a lot of running here, especially if you don’t have much HP and armor on you.
Like the general strategy, you’ll need to clear a turret before attempting to take down minions. On the contrary, take out the weaker ones first

Also, unlike the melee strategy, it’s best to not stand directly at the mouth of the staircase but closer to the wall itself (point 4 below). This will allow you to take out the melee type minions without them retaliating and it’ll take some time before they figure out to use the staircase to get to you.

Ranged players also suffer from ‘false auto-targeting’ syndrome as the turrets are recognised as living targets and will be automatically targeted it’s the closest thing in your vicinity (read forum post here). This makes it very troublesome and potentially fatal if an Ethera is standing slightly further away than the turret from your character’s location, so your character will lock-on to the turret even if he/she is getting a smack down from the Ethera.
If you Own one…
Give yourself a pat on your back as you’ve pulled out a good trap room that would most probably last you till late-game stage. However, do note that you need to configure your trap room well so that those pesky raiders don’t slip through your defenses.
Additionally, there is that nasty blind zone you can exploit strategically make use of.
(a) General Minion Types
Minions you would want to put in place would be those who are able to render themselves invincible for short periods of time in any form possible, except teleportation (as they can teleport out of the auras and usually get killed easily).
Minions that possess skills that reflect projectiles (eg. Voror Knights, Colossus, Ethera), increase their dodge rate (eg. Harpies), or simply don’t take damage when they are attacking (eg. Duergar Scorchers, Thunderfist Brawlers).

Minion positions can be categorised into 3 main rows in the map.
(b) Front Row
In addition to those mentioned in (a), you can throw in a Tormentor or two or some Lurkers to make your potential raiders run around in fear or get stunned/ knockdown-ed to the ground and left helpless as the other minions swarm upon him/her.
(c) Middle Row
In the center row, minions you would want to consider would be less mobile ranged striker types with high damage and low-moderate HP (aka Artillery types: blighters, lacerators, wolves, tormented etc.). The invincibility aura helps them to stay alive a bit longer and also, their range helps them reach both the front and back rows so they’ll be a source of constant damage until they’re taken down.
Alternatively, I find that Colossus types do well here too as their ‘artillery mode’ projectiles can literally cover the entire map and the invincibility aura covers their vulnerability when their shields are down.
If you have a support type minion, it’s best to put it in the middle instead of the back as they are relatively safe even within the initial visual range of the enemy. They are able to heal/ cast shields and are sufficiently ‘shielded’ by the invincible aura.
Don’t put a Pyre Voror in there though, those things are utterly useless. 😦

(d) Back Row
I do recommend you put something here if you have the extra upkeep points to spare. Either a Voror Knight (anti-projectile tank) or a Fire Ogre (high HP) would do nicely as they restrict the users from having a safe zone for them to take down the turrets.
However, it’s advisable not to situate support minions here as they will not act unless you go close to them. For example, if there’s a Gelid Voror at the back, the high defence water shield will not trigger, meaning that he’s basically useless sitting there.
TL;DR: Generally, load ’em up with minions that can make themselves invincible for short periods of time, the turrets will do the rest.
So yes, that’s about it for the Valenthian Guardhouse.
If you have any other things to share or if you have a better strategy than what is written, do leave a comment and I’ll update my blog accordingly.
Thank you and enjoy the weekend!

Are crossbows any good for raiding compared to the other types weapons?
LikeLike
Hey John,
Although I used crossbows at the start, in my opinion, I don’t think it’s worthwhile to use them at higher leagues, unless it is your strongest weapon in your arsenal.
Crossbows are great when against single targets and its inherent ability to knockback (on the 4th consecutive hit), which makes them worthwhile for raiding against keepers or 1v1 with minions. However, in terms of crowd control, crossbows are similar to duals in the sense that the only way to perform effective crowd control would be to have a reasonably high attack stat and/or attack speed to kill off units fast. Furthermore, the downside is that crossbows also suffer from ‘auto-targeting’, meaning that you might hit an unintended target (eg. turrets from Valenthian Guardhouse or a fast moving minion that gets into your line of fire, when you’re trying to take down your other target at the back).
However, if you do only have crossbows as your better weapons, you might want to ensure that they have good %s of crowd control traits first before you use them. Examples would include stun, fear, pushback. Slow is also decent, but arguably less effective. This will help you isolate targets so you only focus on them one at a time. Alternatively, you can also consider running around strongholds (esp for larger ones like the Water trap, Forbidden Courtyard, Ashkardian Crypt) to shake off the slower minions in order to cut down on the amount of targets you have to deal with at once.
Hope this clarifies! 🙂
P.S.: I realised you posted a similar comment in this post so I only approved this one. Hope that is fine with you. 🙂
LikeLike
Are crossbows any good for raiding?
LikeLike
I own this trap house. Is there a good minions to put for this for all 3 locations you marked? For example dread vorors?
LikeLike
For minions specifically, what I would suggest, if you have enough upkeep and the available minions, would be:
Front Row: 2 x Ravagers, 1 x Monkey or 1 x mobile champion (Ignicore, Lord of Eve, Wicker Beast, Succubine etc.)
Middle Row: 2 x Acolytes, 1 x less mobile Champion (eg. Kenashi Warlord, Colossus) or 2 x Assassins
Back Row: 2 x Voror Knights, 1 x Druid
However, do note that this is theoretical and it’s best to configure to the best of what you have at the moment. 🙂
LikeLike
thanks for ur reply.
I have the Kenashi warlord and ice colossus.
I also have the monkey and Druid.
I am resetting my stronghold and hopefully can have a very tough stronghold to beat b4 facing my keeper
LikeLike
You have a Facebook page 8 can follow you on?
LikeLike